Sunday 31 March 2013

Kulm

A third Shako scenario for this year featured the action at Kulm.  Following his victory at Dresden Napoleon ordered his commanders to pursue the allies through the mountains and complete their destruction.  Vandamme commanded one of these columns and his orders directed him to occupy Teplitz and thereby block the main retreat route.  He was advised that the columns under St Cyr and Mortier would be following him in support.  Already he had overcome two rearguards and as he debouched from the mountains and approached Kulm, he received news of yet another enemy force barring his advance.
This was Osterman-Tolstoy with two divisions of infantry and two of cavalry.  His orders were simple, stop Vandamme's advance, whatever the cost.  Reinforcements would be sent as they became available.

The map (apologies for the poor quality), sets out the position at the start of the action.  Vandamme is with Revest's division (4 battalions and a battery), north of Kulm.  Dupas' division (8 battalions and a battery) is marching along the road and has reached Kulm.  behind Dupas is Chastel's light cavalry (5 regiments). Following Chastel are Gorbrecht (5 light cavalry regiments) and Dumonceau with 8 more battalions.  Further back are the corps artillery and Phillipon's infantry division (10 battalions).

On his left flank Osterman has Rosen's Russian Guard division of 6 battalions with two heavy batteries deployed between the villages of Straden and Priesten.  Between Priesten and the southern road to Teplitz are Pischnitsky's understrength division of II Corps (6 weakened battalions) and Pahlen's light cavalry (3 light regiments and 1 dragoon regiment).  Expected Russian reinforcements are Schachafskoi's infantry division and the 2nd Cuirassier division.

Steve took the part of Vandamme and faced the same problem, wait for all his forces to deploy and risk the Allied force becoming stronger, or, attack with what troops he had present.  He decided on the latter, (just like Vandamme) and after a short bombardment Revest's infantry moved forward with orders to seize the village of Straden.  Dupas was to attack Priesten and Chastel move south to counter the threat of Pahlen.

The Russian guns opened up on Revest's infantry as they moved forward, but the men of the 10th line had a proud tradition and ploughed on.  The 2nd and 3rd battalions attacked the village, whilst the 1st battalion, supported by a screen of skirmishers moved round the northern flank.  Rosen had a battalion in Straden and this held off the first attack with ease; the Russian volleys stopping both battalions in their tracks.  The 1st battalion of the 10th was attacked by another guard battalion.  As the Russians advanced, several of their officers were picked off by the French skirmishers and then more casualties were incurred by a volley from the 10th.    With levelled bayonets the guards continued their advance, confident that they could overcome their opponents.  The 10th were equally confident and the two units crashed together. After a short melee it was the Russians who fell back, ceding the ground to their opponents.  Indeed, so overwhelmed were the guardsmen, they took no further part in the action as their remaining officers struggled to restore some semblance of order.  Fortunately for Rosen the 1st battalion of the Semeniovsky regiment was in reserve and they stepped forward to hold the line.  They could not prevent the 10th from overrunning a Russian battery, but they did eventually force the French to fall back across the stream.

In front of Priesten, Pischnitsky's men deployed to meet Dupas' men as they advanced from Kulm.  The long column of Frenchmen were subjected to the fire from the 12lb batteries as they neared the bridge over stream.  Nevertheless they pressed on and soon were massing for an attack on the Ashperon regiment which formed Pischnitsky's front line

A solid phalanx of men swept forward into a maelstrom of musketry from the resolute Russian infantry and though heavily outnumbered, the line held.  His attack having stalled, Dupas deployed into line and began a musketry duel.  Osterman had seen the mass of Frenchmen gathering before Priesten and observing their lack of cavalry support had ordered Schavitch's Guard Light cavalry to attack their flank.  The way was led by the Guard Eger, who bore down on the 1st battalion of the 9th legere who formed the flank guard for Dupas' division.  Unwilling to wait and perhaps a little overconfident, the guards rode forward.  Just in time the Frenchmen formed their square and faced off their assailants.  Unable to close, the Russian cavalry lost men to the defensive volleys and had to fall back to rally. 

However, the withdrawal of the Eger provided no respite for the men of the 9th legere.  They were in canister range of two Russian batteries and felt the full force of their fire.  As they struggled to maintain their ranks the squadrons of the Guard Dragoons charged forward.  This second attack found the gaps created by the artillery and broke into the square, which disintegrated, men fleeing in all directions.  Strenuous efforts by the dragoon officers prevented an uncontrolled pursuit and the regiment rallied back to reform.  The dragoons had been joined in their charge by the Guard Uhlan regiment.  This unit had caught the 2nd battalion of the 9th legere as they waded the stream.   The unlucky infantry had no chance, being butchered where they stood.  Their blood lust awakened, the uhlans charged again and found the flank of the 4th battalion of the 46th line.  This battalion also dissolved into chaos; Dupas' division was on the brink of disaster.  Fortunately for Vandamme, Dupas rallied his troops and Priesten was still under threat.

Although effective, the charge by the Russian cavalry had left a hole in the Russian line.  What Osterman had not seen when he ordered the attack was the approach of Gorbrecht's light cavalry.  Vandamme had directed them to support Revest's infantry, who had tried and failed a second time to wrench Straden from the grip of the Russian guards.  As Gorbrecht moved forward he had seen the Russian cavalry attack and the lack of reserves to cover the Russian centre whilst the Russian cavalry reformed.  All that lay before him were two batteries of guns, eliminate those and the road to Teplitz was open.   With the Polish hussars in the van, the light cavalry moved forward.


On the southern flank Chastel had moved round the village of Karwitz and deployed to attack Pahlen.  His approach had been subjected to fire from Pahlen's horse artillery, but only light losses had been suffered.  Bugles blared and the two divisions of light cavalry closed to melee.  It was at this point that fortune favoured the Russians.  All three melees were won by the Russians and the margins were so extreme that all three units were destroyed.  The subsequent divisional morale roll also came up as '1' so the remaining units also left the field.  With the southern flank secure, Pahlen could be redeployed to the centre, perhaps in time to thwart Gorbrecht.

Unfortunately, we ran out of time at this point, which was a shame as the battle was so finely balanced.  Revest's men were hanging on in the north and had inflicted some damage on the Russian Guard.  Dumonceau's division was at Kulm and following Gorbrecht towards the Tepltz road.  Schavitch's Light Cavalry needed time to recover and Pischnitsky's division was nearing a morale test, being worn down by Dupas' attack.  Schachafskoi's infantry division would arrive in two moves time to support the centre and Priesten.  The Cuirassier division was still some way off.


Monday 25 March 2013

Southam, 24th August 1642

This week's battle is another from the series of ECW Scenario guides  published by Partizan Press.  It is one of a number of small actions from the early war period in and around Coventry.  A Parliamentary force under Lord Brooke met a Royalist force commanded by the earl of Northampton.  Brooke had the advantage of more guns and infantry,  Northampton had the greater number of cavalry.  The Parliamentary force needs to push on across the river Itchen and march on Coventry, the Royalists need to prevent this, or at least delay it and extract the majority of their force before it is overwhelmed.


Brooke's force consists of his own  and Holles' regiments of foot, both rated raw; plus Hampden's regiment of foot (trained). The majority of his cavalry is also raw, only Goodwin's regiment being trained.  He has 6 light guns, the crews all being raw.


Northampton's force consists of his own regiment of foot and Saville's dragoons (fighting dismounted) and two light guns in the centre, with Legge's, Caernarvon's and Wilmot's Horse on his right and Saville's, Compton's and his own regiment of Horse on the left.

We used the 1644 rules and reduced the effectiveness of the Parliamentary cavalry, not allowing them to charge formed enemy troops, requiring them to resort to standing and firing with their pistols.  

The dice decided that I would command the parliamentary force and my cunning plan was to advance the infantry in the centre and 'soften up' the Royalist cavalry with the guns to try and offset my lack of numbers in that arm.  Steve, commanding the Royalists decided that he would use his more numerous cavalry to drive my horse off the field and then 'mop up' the foot.

With a certain amount of confidence both Royalist cavalry wings began their advance.  Due to some fortune with the dice both Legge and Saville lost half their strength before closing with my troops.  This did even things up a bit and for a time my cavalry seemed to be holding their own.  My guns now shifted their attention to the supporting Royalist horse.  To avoid further losses Northampton ordered his own  regiment to charge the guns on my right and Wilmot's to do the same on my left. Unfortunately, the latter were disorganised by the artillery fire and were unable to charge; instead they fell back to reorganise.  However, Northampton's Horse suffered no such problems and charged forward.  Self-preservation now took priority for my gunners and they ran for their lives.  Hampden's and Brookes now found themselves with cavalry threatening their flanks and quickly 'formed a body' to fend off the horsemen.  This of course made them tempting targets for the Royalist artillery who began to exact some revenge.


On my left Ballard and Fiennes regiments of horse had proved unable to hold back their Royalist opponents.  Numbers began to tell and in a trice the remnants of these two regiments broke and galloped for the rear.  The sight of fleeing foes was too tempting for Legge and Caernarvon's men and they pursued their quarry off the field.

My horse on the right fared better.  Against the odds they eventually defeated the Royalist horse and then moved towards Northampton's infantry.  These had been unformed due to casualties caused by my artillery and therefore a viable target for a charge.  Brooke's Horse swept forward but could make no impression on the infantry who stood their ground.  As they fell back a salvo from the Royalist infantry emptied many saddles and the regiment played no further part in the action.

 
Goodwin's Horse had moved towards the centre and took on  Northampton's Horse who were busy butchering artillerymen.  Caught by surprise the Royalist cavalry did not put up much of a fight and were driven from the field.  Fortunately for me Goodwin's men did not pursue their opponents, but rallied and were ready to move forward again.


With his cavalry dispersed and his infantry outnumbered Northampton had no choice but to fall back across the river.  My forces were too far back to interfere with this move, but were adjudged to have achieved a minor victory.

We did re fight the action using the Warhammer ECW rules.  This gave a very different feel to the game, especially for the Royalist cavalry, who in the main, swept all before them.  The only exception was Legge's regiment whose advance stalled under fire and this allowed the Parliamentary cavalry to approach and inflict yet more damage with their pistols.The Royalist artillery was also much more effective, even though it was outnumbered three to one.  Hampden's regiment was reduced to only 25% by the end of the action, mainly due to artillery fire. In this second running of the scenario the day went decisively to the Royalists.

Friday 15 March 2013

Pitzer's Crossing

The scenario this week comes from the pages of Battlegames magazine. It is set in the AWI and concerns the supplies stored at the small settlement of Pitzer's Crossing.  The Rebel forces are keen to move them to safety, whilst the British of course want to secure them for their own uses.  Each side had three small brigades and the action takes place over a typically 'cluttered' terrain.

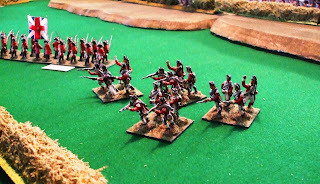
The photo above shows the table from the British viewpoint.  Pitzer's Crossing lies in the top left corner and the supply wagons need to leave along the road which leads to the top right corner.  The rolling countryside allows for the rebels to place units in dead ground and at the start only two units are visible.

I took the part of Frazer Stewart, the British commander and decided to send Brown's brigade containing grenadiers, skirmishers and a line battalion up the left straight towards Pitzer's crossing, with Able brigade, (three line battalions) pinning the visible Rebel forces.  The third brigade, under Carter, contained the artillery and cavalry was on the right and was to act in support of Able.  As usual we were using the Patriots and Loyalists rules and each commander had one good, one average and one poor brigade commander.  For the British Brown was good, Able average and Carter poor.
The rebel commander had the problem of only one brigade being present and the reinforcements which would arrive would hinder the progress of the supply wagons.


The game began with the British making steady progress towards the first hedge line.  On the left, Brown's brigade was making the best speed, with the skirmishers moving through the wooded heights making sure that no rebel riflemen were waiting in ambush. The grenadiers were in column and moving along the road soon reached a position where they could see the area behind the ridge and the Rebel supports.  Seeing the rebel units, Brown moved the grenadiers further to the  left to protect their flank and moved his line battalion forward support the grenadiers.

On the right, Carter was making hard weather of his advance.  The artillery eventually reached the hedge line and began to fire on the rebels in front of them.  After a couple of rounds of fire from the artillery, assuming the rebels would be 'softened up', Carter ordered forward the combined light infantry companies.  The first volley hit the British as they formed up after crossing the hedge. Ignoring the casualties, the British advanced and were then hit by two more punishing volleys.  As the officers tried to restore order a third volley tore into the redcoats and they began to fall back to rally.


In the centre, Able had concentrated the fire of two of his battalions on one of the rebel units.  Unable to withstand the volume of fire the rebels fell back to rally, which fortunately, allowed Able's third battalion to support Carter whilst the light companies were out of action.  However, Able's advance was slowed by the appearance of a third rebel unit at the hedge line.  Again, volleys were exchanged, but the heavier British fire eventually forced the rebels back.

Stewart was beginning to feel confident that he may be able to secure the supplies. Brown had by now outflanked the hedge line held by the rebels, the wooded heights were unoccupied and there seemed to be little to prevent the advance of the grenadiers.  He had just remarked to his aide Tompkins " Able's men are advancing in fine style, he is a credit to the army".  His good mood was dispelled in a moment as Able's brigade was hit by a storm of fire from the rebels.  Having been forced to abandon the heights, the rebels had occupied the wall lining the road to Pitzer's Farm.  From this haven they poured fire on the  advancing British infantry and forced two battalions to fall back to rally.  Just in time, Carter's artillery reached a position where they could fire on the Rebels.  Their efforts bought time for Able's men to rally and move forward again.  The second advance was successful, forcing the rebels to retreat and caused the partial disintegration of the rebel brigade.  Only the strenuous efforts of Archer, it's brigade commander, kept the battered infantry in the line.

Brown's skirmishers had by now almost reached Pitzer's Crossing.  They could see the flurry of activity as the wagons began to move, made worse by the arrival of Bannister's brigade of militia infantry along the road the wagons were trying to use.  Bannister's riflemen reached the outskirts of the village just in time to oppose the British advance.  They were quickly followed by two more militia units and the British would now need to fight their way in.  The grenadiers stepped forward with confidence, supported on their left by the skirmishers they closed on the defenders.  Their mood was shattered by fire from front and flank and they were forced to fall back to rally.  A second advance cleared the flanking militia battalion, but further progress was again stalled by musketry from the rebels.

Arnold Benedict, the Rebel commander was relieved to see the arrival of Cowman's brigade of Continental infantry to support Archer's battered brigade.  Archer had managed to hold the hedge line in front of the second ridge, but he was coming under severe pressure.

By the road the British pushed forward.  The rebels fired two volleys as the British advanced, but undaunted the line of bayonets continued to move forward.  As the lines came closer nervous glances were exchanged by the rebels and then they routed.  

A crisis had been reached.  Benedict had only one unit between the British and the wagons.  If that failed to halt the enemy advance, the day was lost.  Fortunately, that one rebel unit was the combined light infantry companies.  Cowman rode forward, and ordered the light infantry to advance.  This they did then halted and fired a volley.  The British were caught reforming and the casualties caused them to fall back to rally.  British morale was by now reaching a critical level.  All the brigades had lost heavily and Stewart recognised that only one more effort could be made.  Brown and Carter were to hold their positions whilst Able made one more push.  His battered battalions moved over the second ridge and could see the wagons on the road.  Only two battalions opposed them and one was driven off by musket fire.  However, the second stood its ground.  Able found that any further advance would put his flanks 'in the air' and had to settle for a musketry duel. Stewart galloped forward to join Able and arrived just in time to see the last wagon disappear down the road.  


This was an excellent game which swayed one way and the other.  The rebels did extract the wagons, but two of their brigades were severely damaged and they had few leadership points left to keep the brigades in the field.  For the British, they too were severely weakened.  the successive defence lines of the rebel position had given them the time they needed to remove the wagons and also bring their reinforcements into the line.  The leadership points rules, which we were using for the first time,  added another dimension to the decision making by the commanders.
   

Sunday 10 March 2013

Affair at the Oasis II

After a break of a couple of weeks we returned to the gaming table for a colonial game.  Once again Ahmed Mustafa was on a mission to defeat the insurgent Sudanese.  His force had been led a merry dance by the Sudanese forces and he finds himself far from the Nile with water supplies running dangerously low.  His one chance is to reach the oasis at Alam, a fact not missed by the Sudanese.  Usually in these games the Imperial forces march onto a table devoid of Sudanese troops and have to feel their way forward; which is fine as far as it goes, but it does give a big advantage to the Sudanese.  As an experiment we decided to include some element of doubt for the Sudanese commander.  The terrain pieces on the table were each allocated a card from a pack which had 19 Sudanese units and 10 blanks.  Any remaining cards were potential reinforcements which could arrive, at random, on any table edge.
 
 The photo above shows the layout of the table looking towards the Imperial forces. 

I took the role of Sudanese commander and Steve deployed his Imperial troops ready for his advance on the oasis.  Scouts were sent out towards the patches of rough terrain where my units may have been located.  I did have the option of revealing a card myself, but thought it best to encourage Steve to spread his forces out.  The units furthest from the Imperials were moved forward to support those defending the oasis and a good job too as things turned out. 


The scouts reached the first terrain feature (just to the right of the wadi on the left of the photo above) and I turned over the card, to revealed a gun and crew.  Perhaps a bit too close to the enemy, but at least there were a three cards in close proximity which could give some support.  The card in the wadi turned out to be a blank as did a second slightly further back. When the scouts reached my third 'support' this also turned out to be a blank!  My left flank was looking a little thin at this point, but at least I managed to roll high enough to receive a reinforcement, which arrived at the rear table edge.


My supports were now visible to the enemy and had to be revealed, fortunately they proved to be  Hadendoa, though they had a long way to go to contact the enemy and were therefore vulnerable to fire. Steve was stretching out his left hand units to investigate more concealing terrain and was delighted when yet more blank cards were revealed; six of the ten blanks in the pack had been dealt to the terrain features nearest the Imperial troops!  My artillery in spite of being very isolated had managed to draw back and thanks to a hesitant Imperial advance (low dice) had inflicted some casualties in the process.  A charge by a unit of Egyptian troops failed to reach the gun due to terrain and yet more low dice and this enabled the Hadendoa to close with the Egyptian infantry without suffering too many casualties.  The melee was brief and bloody with the Egyptians losing 50% of their men and retreating.  A second unit, advancing in column was uncovered by the retreat, but the Hadendoa were still reorganising after their success and this delay gave the Egyptians just enough time to reform and then stop the Sudanese charge with a volley.


On my right two more Hadendoa units were advancing and the first attacked the Egyptian line.  Again the Sudanese prevailed in the melee, but seeing the Egyptian artillery and also cavalry waiting for them, decided to take cover in some rocky ground. Just in time, my camel and cavalry units were revealed and they moved forward to tackle their opposite numbers.  The camelry were successful against their opponents, but seeking to move around the rear of the Imperial force, found themselves isolated and subject to the fire of the Egyptian artillery.  After losing over half their numbers they had to fall back to rally.  The Sudanese cavalry seemed to have a charmed life.  Three times the Egyptian machine gun jammed when it tried to fire at them (Steve rolled 6s at just the wrong time).  However, when it came to meleeing the Egyptian cavalry their luck changed.  In a trice, they were totally defeated leaving a large gap into which the Egyptian horse could advance. 


The one unit of reinforcements I had received had by now made it's way forward and had occupied the last piece of rough ground in front of the oasis, (that card had proved to be a blank as well!).  The Arab riflemen had managed to pick off a few artillerymen, but found themselves outnumbered and outflanked with no supports in sight.  My gun crew were also falling back in front of the advancing Imperial troops, so in true native fashion my troops elected to fade into the desert, leaving the Imperials to reach the oasis, but regrouping to fight another day.

The use of the hidden units made for an exciting game, even though we had to cope with an extreme result; of the 10 blank cards, 9 were placed on the table, although only half the pack was dealt there.  It did create a viable game with some realism, not all desert columns were faced by overwhelming numbers. Small harassing skirmishes could, over time,  sap the strength of the column ready for the final battle.